Gather Your Ingredients and Tools
When it comes to crafting artisanal Homemade sourdough bread, the first step is to gather all your ingredients and tools. This is a crucial step in the bread-making process as having everything ready and organized will make the rest of the process flow smoothly.
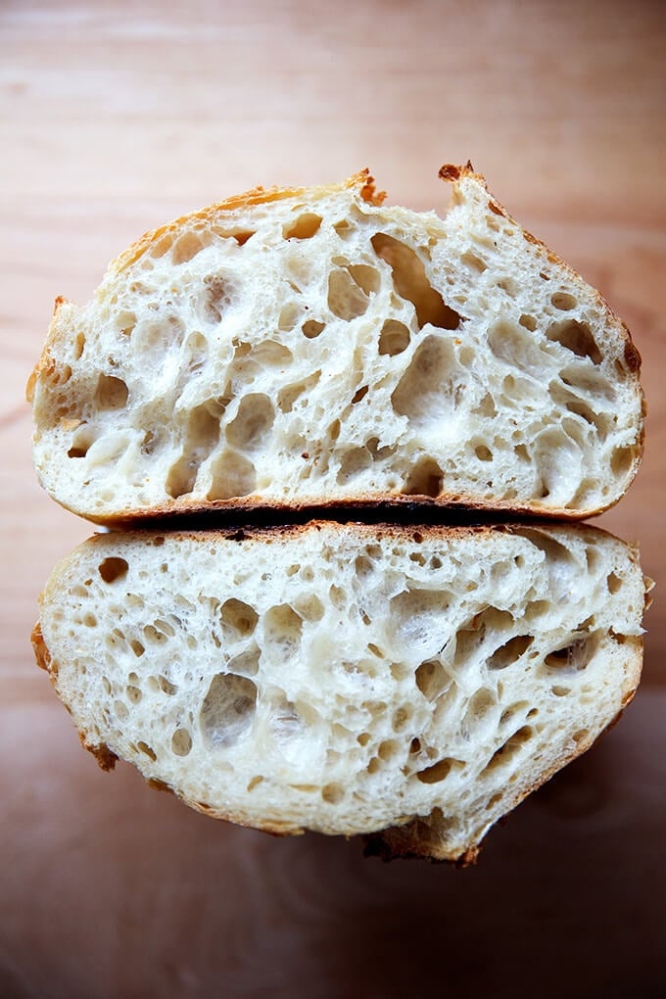
Image Source: theclevercarrot.com
The ingredients you will need for sourdough bread are simple and few, but they are essential for creating that perfect tangy flavor and chewy texture. You will need flour, water, salt, and most importantly, a sourdough starter. A sourdough starter is a mixture of flour and water that has been fermented with wild yeast and bacteria, giving sourdough bread its distinct flavor and texture.
In addition to your ingredients, you will also need a few tools to help you along the way. A mixing bowl, a kitchen scale, a dough scraper, and a Dutch oven are all essential tools for making sourdough bread. The mixing bowl will be used to mix and knead the dough, the kitchen scale will ensure your measurements are accurate, the dough scraper will help you shape your bread, and the Dutch oven will be used for baking.
Image Source: alexandracooks.com
Before you begin the bread-making process, make sure all your ingredients are at room temperature. This will help the yeast in the sourdough starter activate and create a more flavorful bread. Once you have everything ready to go, it’s time to start mixing and kneading the dough.
Stay organized, stay creative, and enjoy the process of crafting artisanal Homemade sourdough bread.
Mixing and Kneading the Dough
Crafting artisanal Homemade sourdough bread is a labor of love that requires patience, attention to detail, and a little bit of elbow grease. One of the most important steps in the sourdough bread-making process is mixing and kneading the dough. This step is crucial in developing the gluten structure that will give your bread its signature chewy texture and airy crumb.
To begin, gather your ingredients – flour, water, sourdough starter, and salt. You’ll also need a large mixing bowl, a sturdy wooden spoon, and a clean work surface for kneading. Start by combining your flour and water in the mixing bowl, stirring until a shaggy dough forms. Add in your sourdough starter and salt, and continue mixing until the ingredients are fully incorporated.
Once your dough has come together, it’s time to start kneading. Kneading is the process of stretching and folding the dough to develop the gluten structure. This helps trap the carbon dioxide produced by the yeast during fermentation, resulting in a light and airy loaf of bread.
To knead the dough, lightly flour your work surface and turn out the dough. Use the heel of your hand to push the dough away from you, then fold it back towards you. Rotate the dough a quarter turn and repeat the process. Continue kneading for 10-15 minutes, or until the dough is smooth and elastic.
As you knead, you’ll notice the texture of the dough changing. At first, it will be sticky and shaggy, but as you continue to work it, it will become smoother and more cohesive. Don’t be tempted to add more flour – a wetter dough will result in a better rise and a lighter crumb.
Once your dough is fully kneaded, shape it into a ball and place it back in the mixing bowl. Cover the bowl with a clean kitchen towel and let the dough rest for about an hour. This resting period, known as the autolyse, allows the gluten to relax and the flavors to develop.
After the autolyse, it’s time to give your dough a few stretch and folds. This technique helps strengthen the gluten structure and improve the overall texture of the bread. To do a stretch and fold, gently stretch the dough out into a rectangle, then fold it in thirds like a letter. Rotate the dough 90 degrees and repeat the process. Continue this folding pattern a few times, then cover the dough and let it rest for another hour.
Once your dough has undergone a few rounds of stretching and folding, it’s time to shape it into a loaf. Gently deflate the dough and shape it into a round or oblong shape, depending on your preference. Place the shaped dough into a floured proofing basket or a clean kitchen towel-lined bowl, seam side up.
Cover the dough with a kitchen towel and let it rise for another 2-4 hours, or until it has doubled in size. This final rise is crucial in developing the flavor and texture of the bread, so be patient and let the dough do its thing.
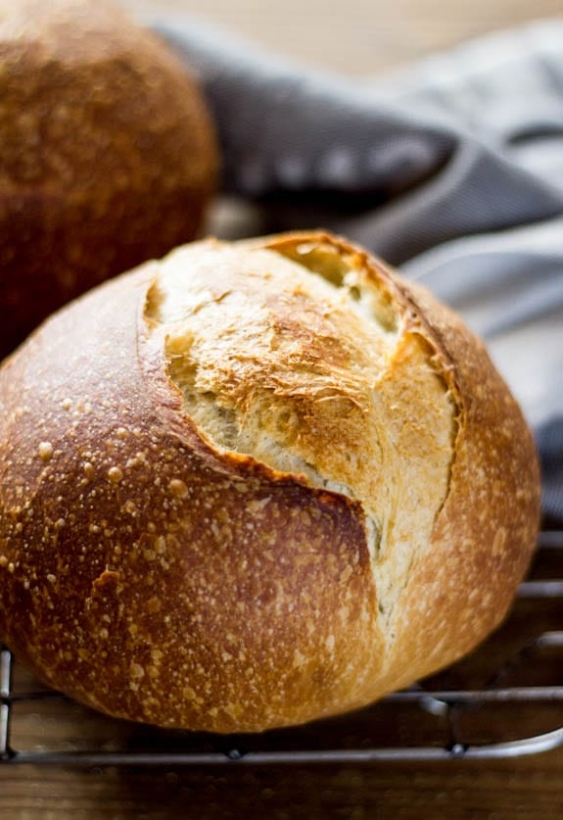
When your dough is ready, it’s time to bake and enjoy the fruits of your labor. Preheat your oven and a Dutch oven or baking stone to 450°F. Carefully transfer the dough to the hot Dutch oven or baking stone, cover with the lid, and bake for 20-30 minutes. Remove the lid and continue baking for another 20-30 minutes, or until the crust is golden brown and the bread sounds hollow when tapped on the bottom.
Once your bread is baked to perfection, remove it from the oven and let it cool on a wire rack before slicing and enjoying. The smell of freshly baked sourdough bread filling your kitchen is a reward in itself, but the taste of that first warm slice slathered with butter is truly unbeatable.
Mixing and kneading the dough is a labor-intensive but incredibly rewarding step in the sourdough bread-making process. By taking the time to develop the gluten structure and allow the flavors to develop, you’ll be rewarded with a loaf of bread that is truly artisanal and Homemade. So roll up your sleeves, get your hands dirty, and start kneading – your taste buds will thank you!
Letting it Rise to Perfection
Ah, the magic of sourdough bread lies in its fermentation process. Allowing the dough to rise and develop its complex flavors is a crucial step in crafting artisanal Homemade sourdough. So, let’s dive into the art of letting your sourdough rise to perfection.
Once you’ve mixed and kneaded your dough to the ideal consistency, it’s time to let nature do its work. The fermentation process begins as soon as the yeast and bacteria in the sourdough starter come into contact with the flour and water. This process creates bubbles of carbon dioxide, which give the bread its airy texture and tangy flavor.
Now, you might be wondering how long you should let your sourdough rise. The answer: it depends. The ideal rise time can vary based on factors like room temperature, humidity, and the strength of your sourdough starter. Generally, a good rule of thumb is to let your dough rise for at least 4-6 hours at room temperature. However, some bakers prefer a longer, slower rise in the refrigerator overnight for deeper flavor development.
During the rise, you’ll want to keep an eye on your dough to ensure that it’s progressing as expected. Look for signs of fermentation, such as an increase in volume, bubbles on the surface, and a slightly tangy aroma. You can also perform the poke test by gently pressing your finger into the dough. If the indentation springs back slowly, your dough is ready to move on to the next step.
As your dough rises, it’s important to provide a warm, draft-free environment for optimal fermentation. You can achieve this by covering the dough with a damp cloth or plastic wrap to retain moisture and placing it in a cozy spot in your kitchen. Some bakers even swear by using a proofing box or a warm oven with the light on to create the perfect conditions for fermentation.
While your dough is rising, take this time to relax and enjoy the anticipation of the delicious sourdough bread that awaits you. You’ll be amazed by how the simple act of letting your dough rise can transform it into a masterpiece of flavor and texture.
Once your dough has doubled in size and is light, airy, and full of bubbles, it’s time to move on to the next stage of the sourdough bread-making process. But don’t rush it – patience is key when it comes to crafting artisanal Homemade sourdough. Trust the process, and you’ll be rewarded with a loaf of bread that’s worth every moment of waiting.
In conclusion, letting your sourdough rise to perfection is a vital step in the art of crafting artisanal homemade sourdough. Embrace the beauty of fermentation, trust in the magic of your sourdough starter, and savor the anticipation of the delicious bread that is soon to come. Enjoy the journey of creating something truly special with your own two hands.
Baking and Enjoying the Fruits of Your Labor
Ah, the moment we’ve all been waiting for – the final step in the process of crafting artisanal Homemade sourdough: baking and enjoying the fruits of your labor. After hours of carefully tending to your dough, it’s finally time to see the results of your hard work and patience.
As you preheat your oven and prepare to slide your beautifully risen loaf into its fiery chamber, you can’t help but feel a sense of excitement and anticipation. The smell of freshly baked bread fills your kitchen, adding to the anticipation of what’s to come.
As the timer counts down and your sourdough begins to transform into a golden masterpiece, you can’t help but feel a sense of pride and accomplishment. This loaf was made with your own two hands, from start to finish, and soon it will be ready to be devoured.
Once the timer chimes and your sourdough is perfectly baked, it’s time to carefully remove it from the oven and place it on a cooling rack. The crust crackles as it cools, and you can’t resist breaking off a small piece to taste. The tangy, chewy texture of the bread is like nothing you’ve ever experienced before – it’s a true work of art.
Now comes the best part – enjoying the fruits of your labor. Whether you choose to slather your warm sourdough with butter, top it with avocado and poached eggs, or simply enjoy it on its own, there’s no wrong way to savor your creation. Each bite is a testament to your dedication and skill, a reminder of the joy that comes from creating something with your own hands.
As you sit down to enjoy your freshly baked sourdough, you can’t help but reflect on the journey that brought you here. From gathering your ingredients and tools to mixing and kneading the dough to letting it rise to perfection, each step was essential in creating this masterpiece. And now, as you take that first bite, you realize that it was all worth it.
So here’s to you, the artisan baker, the sourdough enthusiast, the creator of beautiful loaves. May your bread always rise, your crust always crackle, and your heart always be filled with the joy of baking. And remember, the next time you embark on the journey of crafting artisanal Homemade sourdough, savor every moment – from start to finish.
how to make homemade sourdough


