Gather Your Blooms: Harvesting Fresh Roses
When it comes to crafting DIY rose water, the first step is to gather your blooms. There’s something truly magical about harvesting fresh roses from your own garden or a local flower shop. The vibrant colors and delicate scent of the roses are just the beginning of the journey towards creating your own Homemade elixirs.
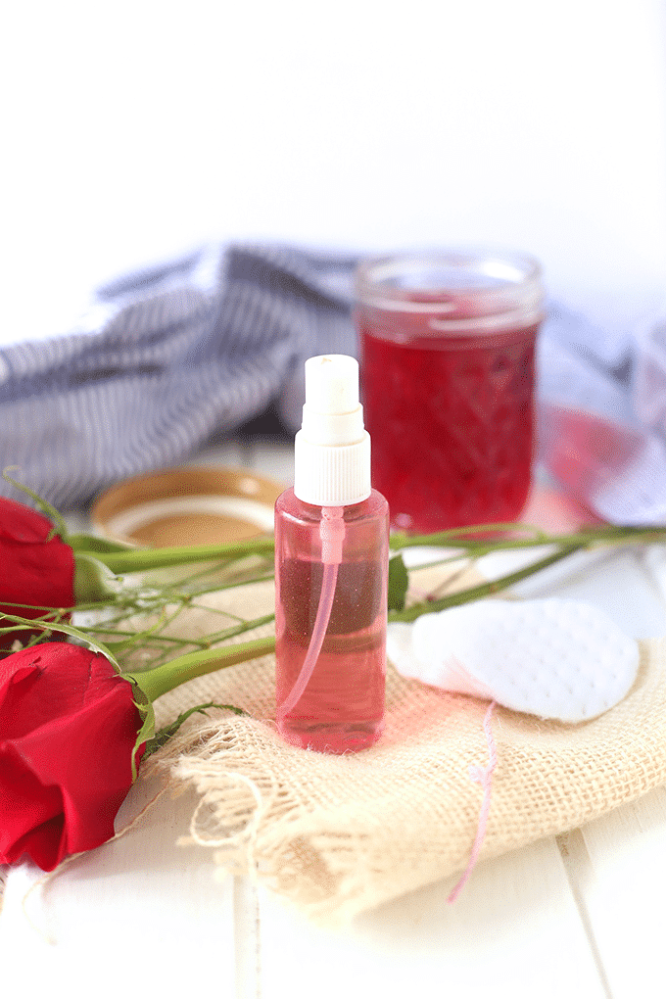
Image Source: thehealthymaven.com
Choosing the right roses for your rose water is essential. Look for roses that are organic and free from pesticides and other chemicals. Roses that are grown in your own garden or sourced from a trusted supplier are ideal. You can also opt for wild roses if you have access to them.
Once you have selected your roses, it’s time to harvest them. Choose roses that are in full bloom and gently pluck them from the stem, being careful not to damage the petals. It’s best to harvest your roses in the morning when they are at their freshest and most fragrant.
As you gather your blooms, take a moment to appreciate the beauty and wonder of nature. Connecting with the flowers you are about to transform into rose water can enhance the overall experience of creating your DIY elixir.
Harvesting fresh roses is the first step towards crafting your own rose water elixir. Take the time to choose the perfect blooms and enjoy the process of gathering them, knowing that you are embarking on a journey to create a natural and nourishing beauty product that will benefit your skin and uplift your spirit.
Infusion Magic: Creating Your Rose Petal Potion
Welcome to the enchanting world of DIY rose water elixirs! In this section, we will delve into the magical process of infusing fresh rose petals to create a luxurious potion that will leave your skin feeling rejuvenated and radiant.
The first step in creating your rose petal potion is to gather your freshly harvested blooms. Choose roses that are in full bloom, with vibrant colors and a strong, sweet fragrance. The quality of your roses will have a direct impact on the potency and effectiveness of your Homemade elixir.
Once you have gathered your blooms, it’s time to begin the infusion process. Start by carefully removing the petals from the roses, being sure to discard any stems or leaves. Place the petals in a clean glass jar, making sure to pack them down tightly to maximize the infusion.
Next, bring a pot of distilled water to a gentle simmer on the stove. Pour the hot water over the rose petals in the jar, completely covering them. The heat from the water will help to release the essential oils and beneficial compounds from the petals, resulting in a potent and fragrant elixir.
Allow the rose petals to steep in the hot water for at least 12 hours, or overnight, to ensure that the infusion is strong and concentrated. During this time, the water will take on the delicate scent and color of the roses, transforming into a magical potion that is packed with skin-loving properties.
After the steeping process is complete, strain the rose petal potion through a fine mesh sieve or cheesecloth to remove any remaining petals and debris. The resulting liquid should be a clear and fragrant rose water that is ready to be bottled and stored for future use.
As you pour your rose petal potion into bottles or jars, take a moment to appreciate the beauty and essence of the elixir you have created. The soft pink hue and floral scent are a testament to the natural healing and nourishing properties of the roses, which have been revered for centuries for their skincare benefits.
Now that you have created your rose petal potion, you can use it in a variety of ways to pamper and nourish your skin. Whether you choose to mist it onto your face as a refreshing toner, add it to your bath for a luxurious soak, or incorporate it into your skincare routine as a hydrating serum, the possibilities are endless.
By infusing fresh rose petals to create your own Homemade elixir, you are tapping into the ancient art of herbal alchemy and harnessing the power of nature to enhance your beauty and wellbeing. So go ahead, indulge in the magic of rose water and treat yourself to a little luxury with your very own rose petal potion.
Bottling Beauty: Storing Your DIY Elixir
Welcome back to our guide on Crafting DIY Rose Water: A Natural Guide to Homemade Elixirs! In this segment, we will explore the important step of storing your Homemade rose water elixir. After all the hard work you put into creating your potion, it’s essential to ensure that it is properly stored to maintain its freshness and potency.
Once you have infused the magical essence of rose petals into water, it is time to bottle up this beauty elixir to reap its benefits for weeks to come. Here are some tips on how to store your DIY rose water elixir:
1. Choosing the Right Container:
When it comes to storing your homemade rose water elixir, the container you choose plays a crucial role in maintaining its quality. Opt for dark glass bottles or jars to protect the elixir from light exposure, which can degrade its potency over time. Additionally, make sure the container has a tight-fitting lid to prevent any air from entering and causing contamination.
2. Store in a Cool, Dark Place:
To preserve the freshness and efficacy of your rose water elixir, it is important to store it in a cool, dark place. Avoid placing the container in direct sunlight or near heat sources, as this can accelerate the degradation of the elixir. A pantry or cabinet away from sunlight is an ideal storage spot for your DIY potion.
3. Labeling and Dating:
To keep track of the potency and expiration date of your homemade rose water elixir, it is recommended to label the container with the date of creation. This will help you determine when it is time to make a fresh batch of rose water and ensure that you are using the elixir at its peak potency.
4. Refrigeration for Longevity:
If you want to extend the shelf life of your DIY rose water elixir, consider storing it in the refrigerator. The cool temperature of the fridge can help preserve the freshness and efficacy of the elixir for a longer period. Just make sure to label the container and keep it away from any strong-smelling foods to prevent contamination.
5. Refreshing Your Elixir:
Over time, the potency of your homemade rose water elixir may diminish. To refresh the elixir, you can simply add a few fresh rose petals to the container and shake it gently. This will infuse new life into the elixir and enhance its fragrance and benefits.
By following these simple storage tips, you can ensure that your DIY rose water elixir remains fresh, potent, and ready to pamper your skin with its nourishing properties. So go ahead, bottle up that beauty and enjoy the natural goodness of homemade rose water elixirs!
Pamper Your Skin: Benefits of Rose Water Elixirs
When it comes to skincare, there are few ingredients as luxurious and beneficial as rose water. This natural elixir has been used for centuries to pamper the skin and provide a radiant, youthful glow. From reducing inflammation to hydrating the skin, rose water offers a plethora of benefits that can transform your skincare routine.
One of the key benefits of rose water is its ability to soothe and calm the skin. Whether you have sensitive skin that is prone to redness and irritation, or you simply want to give your skin a little extra love, rose water can work wonders. Its anti-inflammatory properties help to reduce redness and swelling, making it the perfect solution for those pesky breakouts or post-shave irritation.
In addition to its calming effects, rose water is also incredibly hydrating. It helps to lock in moisture and keep the skin looking plump and radiant. If you struggle with dry or dehydrated skin, incorporating rose water into your skincare routine can help to restore balance and give your complexion a much-needed boost.
Another benefit of rose water is its ability to tone and tighten the skin. The natural astringent properties of rose water help to minimize the appearance of pores and give the skin a firmer, more youthful look. By using rose water regularly, you can help to improve the overall texture and tone of your skin, leaving it looking smoother and more refined.
Not only does rose water benefit the skin on a surface level, but it also works to nourish and protect the skin from within. Rich in antioxidants, rose water helps to combat free radicals and environmental stressors that can lead to premature aging. By incorporating rose water into your skincare routine, you can help to prevent fine lines and wrinkles, and keep your skin looking youthful and radiant.
For those with acne-prone skin, rose water can be a game-changer. Its antibacterial properties help to combat acne-causing bacteria and prevent breakouts from occurring. By using rose water as a toner or spot treatment, you can help to keep your skin clear and blemish-free.
In addition to its skincare benefits, rose water also has a calming and uplifting effect on the mind and spirit. Its delicate floral scent can help to reduce stress and anxiety, making it the perfect addition to your self-care routine. Whether you’re spritzing it on your face before bed or adding it to a relaxing bath, rose water can help to create a sense of calm and tranquility.
Overall, the benefits of rose water elixirs are truly endless. From soothing inflammation to hydrating the skin, this natural ingredient has the power to transform your skincare routine and leave you with a glowing, radiant complexion. So why not give it a try and see the amazing results for yourself? Your skin will thank you for it!
how to make homemade rose water


